Please welcome Debbie Maddy from Calico Carriage Designs is her website and her blog
Needlework or Jewelry Bag
My hostess at a workshop in Angleton, Texas taught me the basics for this little bag. Please read all directions before starting this project.
Supplies:
- Fabric – 2 coordinating fat quarters
- 2 yds of 1/4″ ribbon or cord
- Disappearing marking pen or chalk
- Sewing machine
- Basic sewing supplies
- Yarn needle or safety pin.
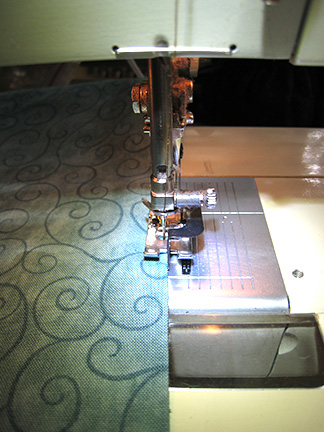
Cut a 14″ and 7″ square from each fat quarter. Place the two 14″ squares right sides together. Sew 1/4″ from outside edge on both leaving about 3″ open on one side.

Clip corners and turn right side out. Turn the open edge in 1/4″ and press all edges flat. Stitch close to the edges around the whole block. If you have an edge stitch foot, it helps to keep the stitching straight.
The top stitching will close the openings. Repeat for the 7″ squares. Use a chalk wheel or disappearing marking pen to mark a line corner to corner in both directions on the top side of the small square. Fold the large square in half and finger press in both directions to find the center. Place the small square in the center of the large square. The fabric that will be the inside of the bag should be facing up with the contrasting side of the small square facing up.

Sew on the marked lines in both directions, backstitching at the corners. Turn the squares over and measure 5″ in from each corner. Fold the corners back.
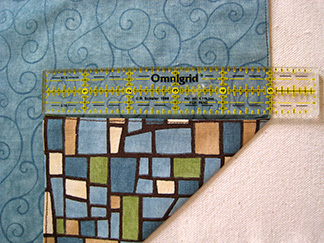
Mark a line 1/2″ from the corner edges and stitch on the lines back-stitching at the beginning and ending.

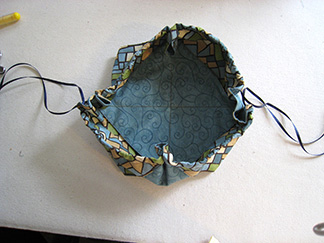
Cut the ribbon into two pieces. Thread ribbon into yarn needle

or safety pin and weave it through the channels created by the stitching. Leave tails of ribbon on one side and tie the ends together with a knot. Run the other ribbon through, leaving tails on the opposite side.

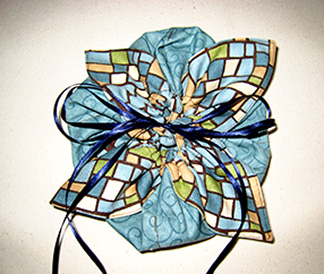
Pull the knots on both sides to draw up the square to form a small bag. The square inside will make small pockets to organize contents.
The little pouch looks like a flower when viewed from the top.
Thank you Debby! That is so darn cute 🙂
Tomorrow, Karen West from Thimble Pleasures I hope you’re having a good time!

July 26, 2008 at 10:14 am
I have made dozens of those little flower bags from large enough for lunch bags to small enough to carry earrings in your luggage. I found the pattern in a Japanese bag book. It’s so cute and easy.
July 26, 2008 at 12:16 pm
Thank you Cotton Spice and Debbie Maddy. I had seen something like this and am excited to get the pattern. I love your choice of pattern mixing too.
July 26, 2008 at 8:56 pm
This looks like a really fun thing to try! Thanks a bunch.
July 28, 2008 at 8:56 am
What a fun gift bag!!!
July 30, 2008 at 2:03 pm
Thanks! I have been looking for this pattern a long time. This will be fun to make and give!
July 30, 2008 at 6:29 pm
Your fabric choices were great for this project, and it looks simple enough. What a great quick project. Thanks
July 31, 2008 at 9:31 pm
I am so going to have to make one of these! Awesome!
August 7, 2008 at 7:22 pm
Such a sweet pattern, but sadly, my first attempt wasn’t 100% successful – I couldn’t get the bag to close all the way. A girlfriend tried it as well, and got the same results I did. We’ve posted a couple of pictures on my blog – I wonder if our fabric was too thick, or our ribbon too wide, or … ??? The instructions are incredibly simple to follow and even tho ours didn’t work out perfectly, it was easy to see that if they could draw closed properly, they’d be verrrrry sweet little bags. They’d be adorable made in larger sizes too. Any suggestions or hints, or did anyone else have the same problem as we did?
August 14, 2008 at 5:44 pm
I too tried this adorable bag but my opening was much too big. I used fairly thin ribbon and 100% cotton fabric. I’d be afraid of jewelry falling out. I may try again with different fabric. Maybe doing a rolled edge on 1 piece each of a batik might work.
August 16, 2008 at 10:05 am
THANK YOU SO MUCH! I found your little bag tutorial today, and just had to try it. It turned out just perfectly! It looks like a cute little flower! I tried a wider ribbon first, and was not happy with it, but when I used the very thin ribbon, it worked just great! I have put a few items in it, and will give it to one of my quilting ladies for her birthday. I am going to make several more, fill them with notions and use them for more ‘quilty’ gifts. I am already thinking how beautiful they would be in Christmas colors.
Thank you so much for this tutorial!
Michelle
February 3, 2009 at 1:17 pm
This project looked so right for some FQs I had on hand. I followed the instructions exactly, measurements exactly like in the instructions, but there is no way I can get the bag to close all the way. I used 1/8 inch ribbon, but there is just too much fabric at the closure to make the bag close. 😦
I used 100% cotton quilting fabrics.
Erica